Step 4: Add Your Game Files & Edit the Index.js
We (finally) have all our various prerequisites in place. Now we can start adding our game files and actually do things.
Add Your Game Files
Head into your project folder, and into the src subfolder. This is where you're going to add your game content. There are two files in there that you'll want to delete: index.html and index.css. These are just placeholders, so get rid of them and add your own content instead.
Depending on how complex your game is, you might decide to organize your assets in different ways; for the purpose of this tutorial, we'll assume that you have a very simple structure: an index.html file (your own, not the placeholder) and a folder called Assets that contains everything else (graphics, CSS files, Javascript, etc.) Make sure that you include all of your game files: this is going to be the master source for everything when we build your game for Steam. You should have something that looks like this inside your src folder:
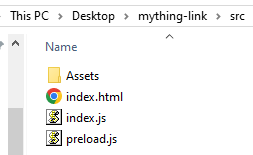
Good? Great. Now we need to edit the index.js file. This is a Javascript file that's going to be the actual file that Electron uses for all its instructions, and where we're going to have to do a lot of configuration to get things talking properly. There are ways to make this fancier and just various options -- feel free to research it and changes things after you get the basics working.
Almost everything we're doing is based off the Electron Quick Start Guide, so don't be afraid to go reference that if needed.
Edit the Index.js
Open up the index.js file. You can do this in any text editor, but make sure that you give it a .js extension, not a .txt extension (or anything else). For ease of packaging, I've included my own index.js (as a .txt file, so it doesn't actually execute) that you can download and copy-paste into yours. Do that, and then we'll explore what this does.
const { app, BrowserWindow, screen, ipcMain } = require('electron')
const steamworks = require("steamworks.js")
const path = require('node:path')
These set some very basic, very vital variables in your index.js.
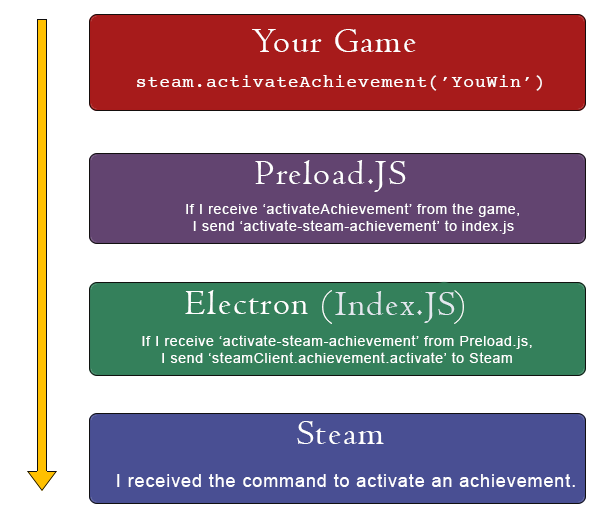
The first one pulls from the electron module we installed, and imports a few built-in things ('app', 'BrowserWindow', 'screen', and 'ipcMain'). The 'app' module represents your actual game (your application), while 'BrowserWindow' is the built-in browser we talked about earlier that will actually display your application. 'Screen' is your computer screen, and we're using that to figure out what size to make the window. 'ipcMain' is an object which allows the Javascript outside your game (the 'main process') to communicate with the Javascript inside your game (the 'renderer process').
The second line pulls in Steamworks.js so we can use it with the short name of 'steamworks', and the third line ('const path') tells Electron to make sure it knows where NodeJS lives. (Remember NodeJS? We downloaded it at the very beginning.)
const createWindow = () => {
  const { width, height } = screen.getPrimaryDisplay().workArea;
  const mainWindow = new BrowserWindow({
	title:"Mything Link 1.2.3",
    width, height,
	menuBarVisible: false,
    webPreferences: {
      preload: path.join(__dirname, 'preload.js'),
      devTools: false,
	  contextIsolation: true,
      nodeIntegration: true
    },
  });
  mainWindow.setAspectRatio(16/9);
  mainWindow.loadFile(path.join(__dirname, 'index.html'));
};
A larger block here, but most of this is doing exactly one thing: creating a browser window. We give it a title, we set its width and height (setting it to the entire area of their currently active screen), as well as hide the menu bars to present a sleeker appearance so it looks more like an application and less like a web browser. The 'webPreferences' section is a bit less intuitive. It tells the script to load another script file -- the 'preload.js' file. We haven't made that yet, so if we were to run this right now, it wouldn't work. The devTools: false tells it not to display any debug tools, 'nodeIntegration' tells it we do want NodeJS built-in, and 'contextIsolation' is a security setting that keeps different scripts separated from each other.
Important: Steamworks.js documentation says to set contextIsolation: false; however, I was unable to get Steam integration to work with it set to false. This appears to be an issue in Steamworks.js itself (see Issue #121). Steam integration will work with the value set to true -- if we use the preload.js script, which is why that's in there.
In the last two lines, we set the aspect ratio, so things stay appropriately scaled if the user resizes things -- if you want users to have more flexibility, remove that. Lastly, of course, we have to tell the script which webpage to load: our index.html file.
// This method will be called when Electron has finished
// initialization and is ready to create browser windows.
// Some APIs can only be used after this event occurs.
app.whenReady().then(() => {
  createWindow()

  app.on('activate', () => {
    // On macOS it's common to re-create a window in the app when the
    // dock icon is clicked and there are no other windows open.
    if (BrowserWindow.getAllWindows().length === 0) createWindow()
  })
})

// Quit when all windows are closed, except on macOS. There, it's common
// for applications and their menu bar to stay active until the user quits
// explicitly with Cmd + Q.
app.on('window-all-closed', () => {
  if (process.platform !== 'darwin') app.quit()
})
The 'app.whenReady' line tells the script (once it's ready) to create the actual browser window that we defined above, with some special instructions for Mac, and the last little bit gives some special instructions for Mac to quit the app then the user closes all the windows.
You'll notice in my index.js I have some Steam-specific coding at the bottom. You can go ahead and copy it into yours, but we'll come back to that to explain it, later.

